
Gen2/Gen5 Printer– JCM
Manufacturer Recommended Cleaning Interval: At Least Once A Year
JCM strongly recommends an annual completion of the Cleaning and Preventive Maintenance procedures to ensure that the GEN5 Printer performance meets factory specifications for trouble-free operation.
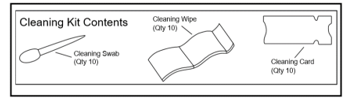
Note: JCM’s Printer Cleaning Kit (P/N 350-00292-100) is recommended for best results.
Cleaning With The Cleaning Card
- Ensure machine powered on.
- Pull the Printer out of the machine on its Sliding base.
- Remove any loaded Tickets from the Printer.
- Remove the Cleaning Card from its protective packaging.
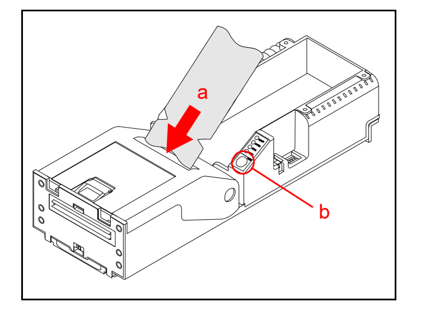
- Carefully insert the Card’s “T”-shaped notched end into the Printer’s Ticket In Slot [a in image below] The cleaning Card will automatically feed into the Printer.
- Press and hold the Feed button on the Keypad [b in image below] to feed the Cleaning Card through the Paper path.
- Carefully remove the Cleaning Card from the printer’s Ticket Out Slot.
- Feed 2 or 3 Tickets through the Printer to remove alcohol residue.
NOTE: Each Cleaning Card is intended for single use only. Always use a new Cleaning Card for each cleaning cycle.
Print Head and Roller Cleaning Procedure
To clean the GEN5 Printer Print Head and Rollers, perform the following procedure:
- Pull the Printer out of the machine on its Sliding Base.
- Remove any loaded Tickets.
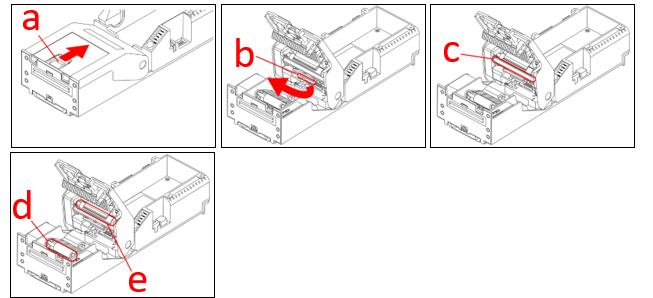
- Press the Lid Release Lever to open the Printer Lid [a in image below]
- Pull the Print Head Release Lever to release the Print Head [b in image below]
- Use non-flammable compressed air to remove dust and dirt from the compartment, Print Head
[c in image below], Rollers, Paper Out Sensor and Taken Sensor. - Press down on the Print Head Release Lever to lower the Print Head, then gently wipe a cotton swab along the length of (and inside) the Print Head [c in image below], Then return the Print Head Release Lever to its closed position.
- To clean the Print Head Rollers [e in image below] and Feed Rollers [d in image below], turn the Rollers by hand while wiping them with a new Cleaning Wipe or a clean Microfiber cloth (slightly dampened with Isopropyl Alcohol).
Sensors Cleaning Procedure
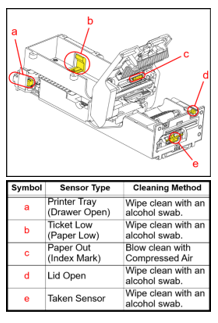
The GEN5 Printer has five (5) Sensors that monitor Print Activity and Ticket Feeding to provide reliable product performance.
NOTE: Refer to image and table to the right for Printer Sensor Locations and Cleaning Methods.
- Press the Lid Release Lever to open the Printer Lid [a in image above]
- Clean the surfaces of the Sensors using Isopropyl Alcohol and a clean cotton swab.
NOTE: The Paper Out (Index Mark) Sensor Lid [c in image right] is located within the Print Head approximately 1 inch from its right edge. This sensor should be cleaned using non-flammable Compressed Air.
- Close the Printer Lid.
- Realign the Printer with the Sliding Base, then reinstall it into the machine. Not forgetting to re-load the tickets.
Copyright:
The information: text and graphics are all used with the respective owners’ permissions. All intellectual properties including both text, images and logos belong to their respective copyright owners and should not be distributed without prior permissions.
The information provided in this guide cannot be reproduced or copied in any way for commercial purposes without the prior authorisation of all related copyright holders.